Parameters
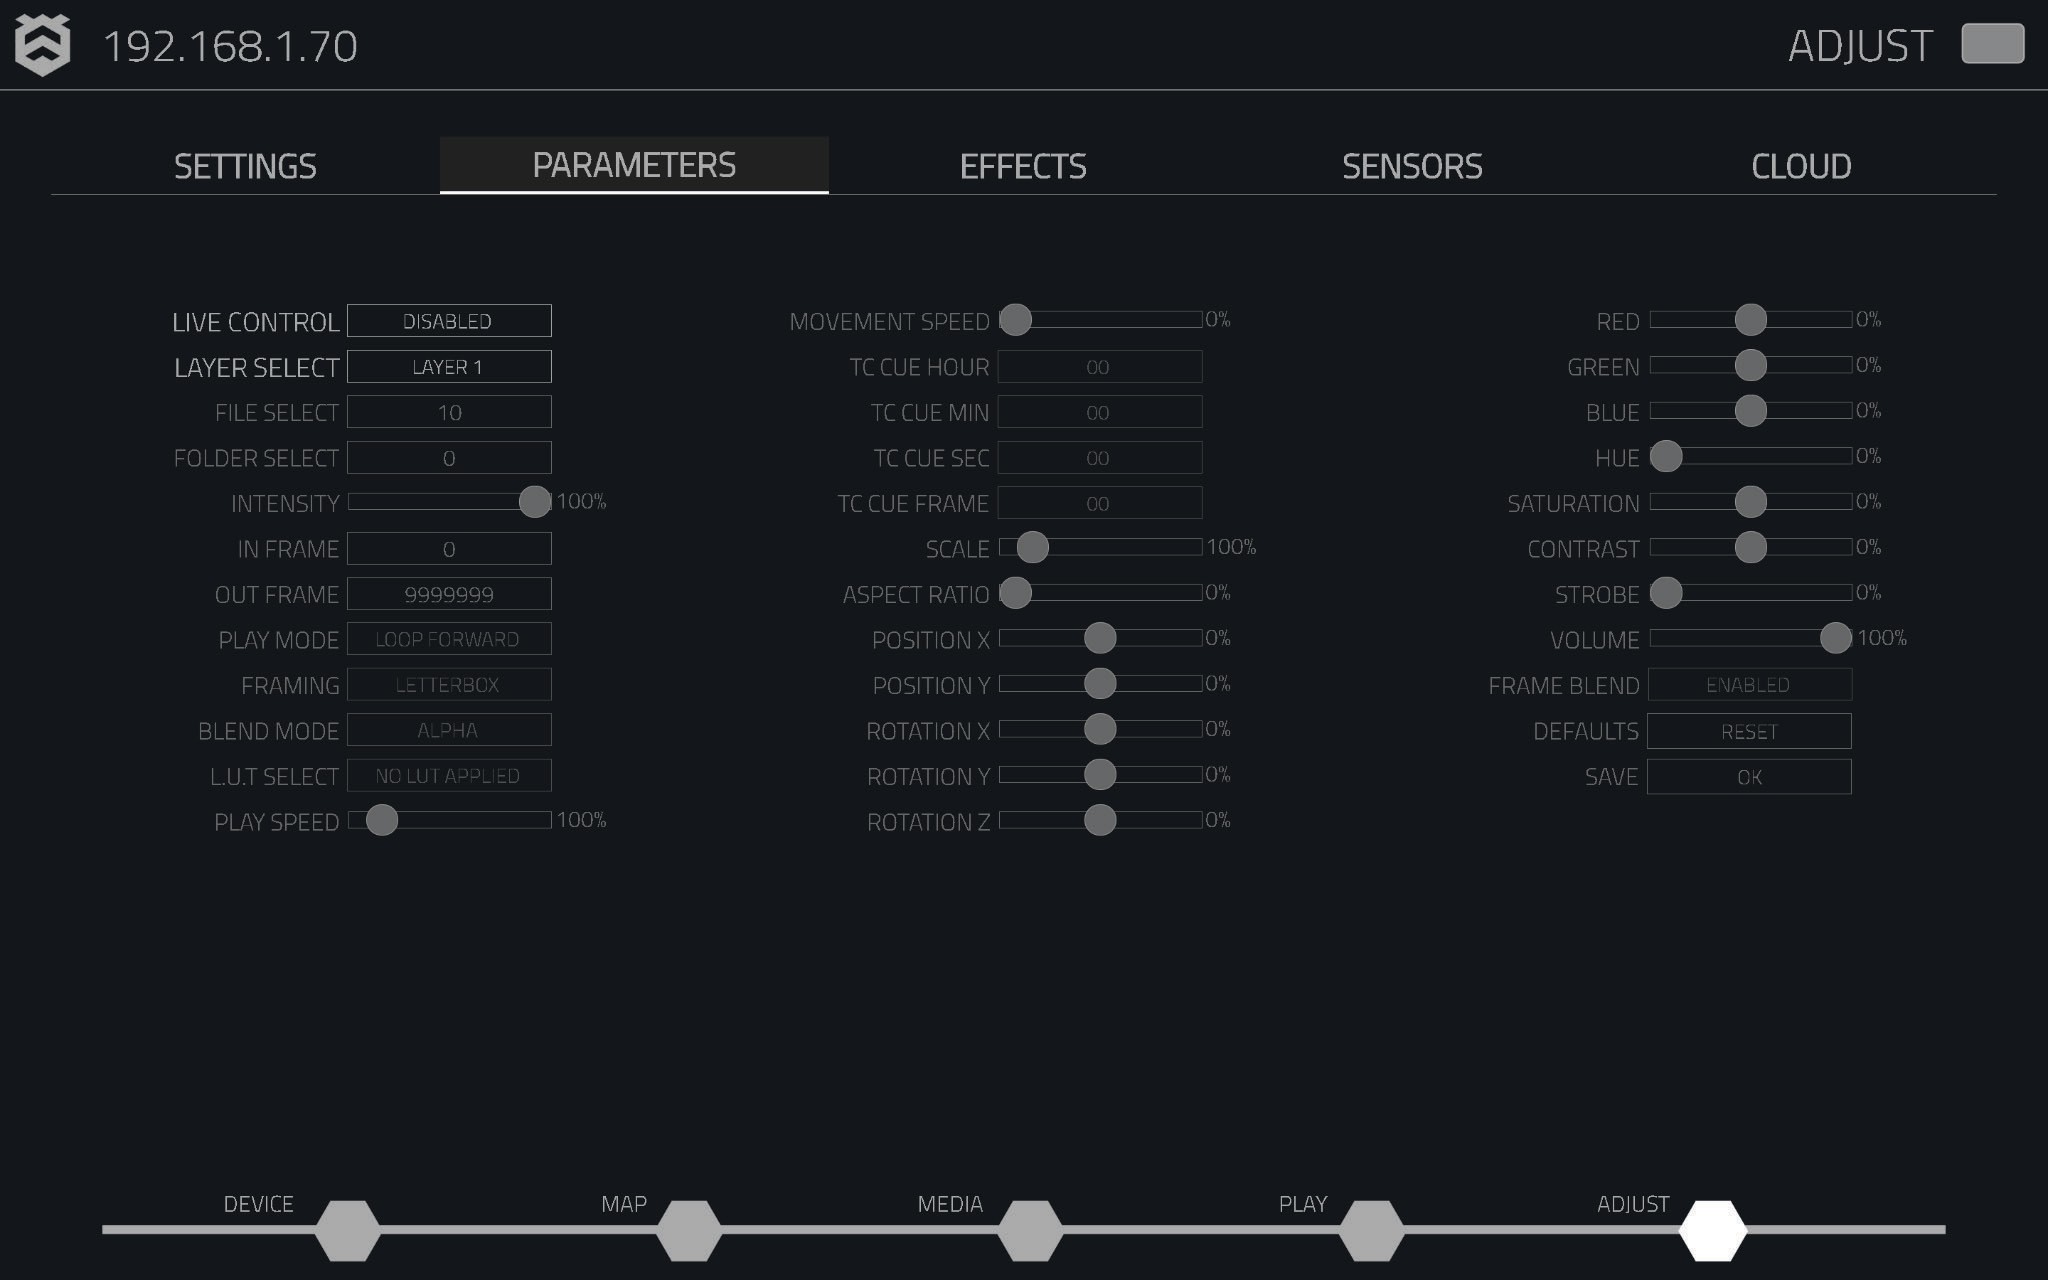
The Parameters tab allows customisation of the playback and display settings for media on the Hive player. This tab provides control over a variety of layer parameters, enabling adjustments to media output according to specific requirements. These adjustments can also be made using UDP, OSC, or ArtNet commands, offering flexible remote control options for advanced users.
Note: The Parameters tab is disabled by default. It must be enabled from the dropdown menu.
Live Control
The Live Control dropdown enables quick enabling or disabling of all adjustable parameters within the tab, allowing real-time adjustments.
Layer Select
The Layer Select dropdown allows switching between different layers for control, enabling adjustments to settings for each layer individually.
File Select
The File Select box enables the selection of an item from the media list on the Media page. Each asset in the media list is assigned a unique identifier, which appears before the media name. This identifier corresponds to the options available in the File Select box.
Folder Select
The Folder Select box provides the option to select a folder from the Media page. All folders are numbered sequentially, with the main media folder designated as Folder 1.
Intensity
The Intensity slider adjusts the brightness of the selected layer. By default, it is set to 100. The intensity can also be manually adjusted by selecting the value next to the slider and entering a number.
In-Frame
The In-frame box determines the starting frame for the currently playing asset, providing precise control over where playback begins within the media.
Out-Frame
The Out-frame box sets the end frame, specifying where the playing asset will stop.
Play Modes
The Play Modes dropdown provides options for selecting how the current asset will play. Hive offers 21 different play modes, including options such as looping forward, looping backward, or playing the content just once.
Framing
The Framing dropdown allows for the selection of how the content is displayed within the output area.
| Framing Option | Description |
|---|---|
| Letterbox | Maintains the aspect ratio of the output image, adding black borders as needed. |
| Crop | Focuses on the centre of the image, discarding any excess that extends beyond the output edges. |
| Tile | Repeats the image to fill the available output area. |
| Stretch | Uniformly fills the output region, adjusting width or height as required, which may stretch or squeeze the content. |
| Multi Letterbox | Centres the output content, adding borders on the sides of the image. |
| Centered | Zooms in on the content uniformly, positioning the centre of the image in the middle of the output. |
Blend Mode
The Blend Mode dropdown allows selection of different modes, such as Alpha, Additive, and Multiply, to control how Layer 1 and Layer 2 are mixed.
LUT Select
The LUT Select dropdown provides 38 pre-installed LUTs to choose from. For custom LUTs, use the "Manage LUT" button at the bottom of the list, followed by the "Upload LUT" option in the bottom-right corner to import and apply a new LUT.
Play Speed
The Play Speed slider adjusts the playback speed of the content, with the option for manual input for more precise control.
TC Cue Hour
The Timecode Cue Hour box sets the starting hour for the timecode. The default value is 0.
TC Cue Min
The Timecode Cue Minute box sets the starting minute for the timecode. The default value is 0.
TC Cue Sec
The Timecode Cue Second box sets the starting second for the timecode. The default value is 0.
TC Cue Frame
The Timecode Cue Frame box sets the starting frame for the timecode. The default value is 0.
Scale
The Scale slider adjusts the size of the selected layer. Manual adjustments can also be made by selecting the value and entering a specific number.
Aspect Ratio
The Aspect Ratio slider adjusts the width and height ratio of the selected layer. Manual adjustments can also be made by selecting the value and entering a number.
Position X
The Position X slider adjusts the horizontal placement of the selected layer. Manual adjustments can be made by selecting the value and entering a specific number.
Position Y
The Position Y slider adjusts the vertical placement of the selected layer. Manual adjustments can be made by selecting the value and entering a specific number.
Rotation X
The Rotation X slider adjusts the rotation of the selected layer along the X-axis. Manual adjustments can be made by selecting the value and entering a specific number.
Rotation Y
The Rotation Y slider adjusts the rotation of the selected layer along the Y-axis. Manual adjustments can be made by selecting the value and entering a specific number.
Rotation Z
The Rotation Z slider adjusts the rotation of the selected layer along the Z-axis. Manual adjustments can be made by selecting the value and entering a specific number.
Colour Adjustments
- Red: The Red slider increases the red hue in the composition. Manual adjustments can be made by selecting the value and entering a specific number.
- Green: The Green slider increases the green hue in the selected layer. Manual adjustments can be made by selecting the value and entering a specific number.
- Blue: The Blue slider increases the blue hue in the selected layer. Manual adjustments can be made by selecting the value and entering a specific number.
- Hue: The Hue slider adjusts the overall hue of the selected layer. Manual adjustments can be made by selecting the value and entering a specific number.
- Saturation: The Saturation slider adjusts the intensity of colours in the selected layer. Manual adjustments can be made by selecting the value and entering a specific number.
- Contrast: The Contrast slider adjusts the difference between light and dark areas in the selected layer. Manual adjustments can be made by selecting the value and entering a specific number.
Strobe
The Strobe slider adjusts the strobe effect applied to the selected layer. Manual adjustments can be made by selecting the value and entering a specific number.
Volume
The Volume slider controls the audio output volume for the selected layer. The default value is 100.
Frame Blend
Frame blending smooths the playback of content with mismatched frame rates by blending frames together. This option is enabled by default for a smoother viewing experience.
Defaults and Save
- Defaults: Restores all settings to their original values. Unsaved changes will be discarded when this option is selected.
- Save: Saves any changes made to the parameters, ensuring they persist after a device restart.
Resetting Individual Parameters
Double-clicking anywhere on a slider resets its value to the default setting for that parameter.