Naturally easy to use
Ingenious by nature, ingenious by design. The Hive user interface can be operated from any modern web browser, on any device.
You can even build a custom user interface for your client’s laptop, phone or tablet. We think of it like organic technology – flexible and adaptable to suit the nature of your project.
Device
Getting started
The first thing you will see when you log into your HIVE player is a page which describes the status of your device.
From this page you will see a preview of the video output from your hive player. You can also check the output resolution, remaining storage, number of media files, serial number and software version.
Map
Simple Mapping
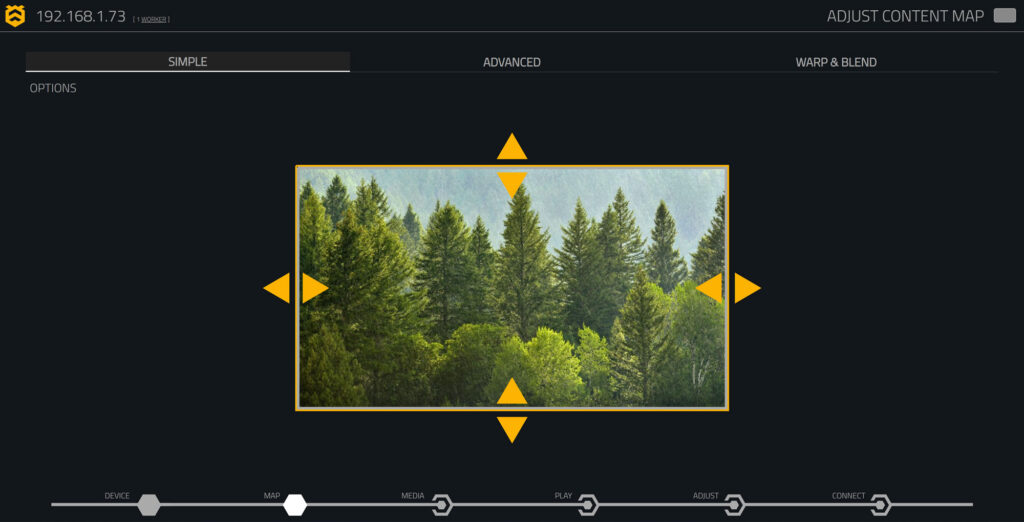
On the MAP page you can configure how your videos will be drawn to the video output. Using simple arrows to drag the output region you can quickly and easily ensure that the video output aligns with your desired output dimensions on your projector, LED wall or video processor.
Using the options menu will let you select standard aspect ratios and demo images.
Advanced Mapping
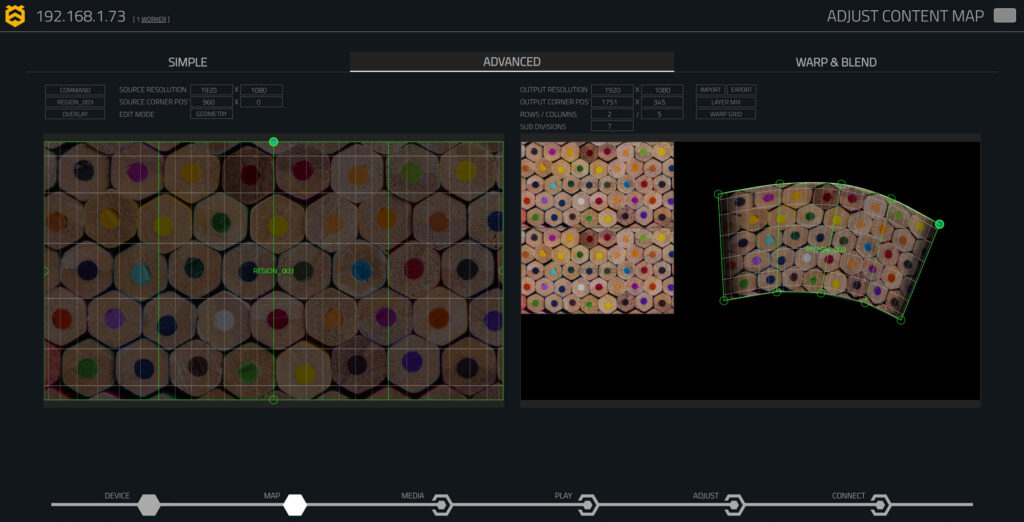
On the advanced mapping page you can add any number of source and destination regions. This is a powerful feature enabling configurations of large and complex video outputs. Regions can also be converted into four point warps, masks and multi point warp grids with user adjustable blending.
You can import & export your output configurations to/from a text file which allows you to store multiple output configurations and recall them again in the future. You can also share the output configuration with other HIVE systems & users.
Output configurations are stored in the JSON format. Highly complex mappings can be generated from your 3D software environment or scripting language of choice.
Warp & Blend
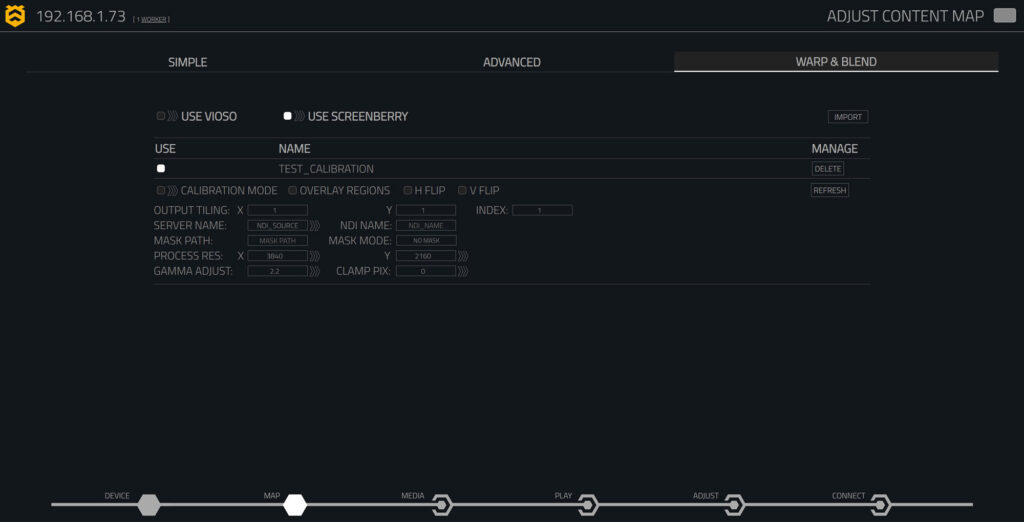
Using the warp and blend page the user can import warp and blend configuration files from 3rd party camera calibration tools such as VIOSO® & Screenberry ™.
These calibration files allow the user to create huge video projections comprised of multiple projectors blended together to make 1 large output.
This technology can be used to map domes and large curved surfaces.
Media
Media Management
The software also supports images, web pages, user applications, and live inputs such as NDI & USB Video inputs, plus watch folders.
For more information on encoding media for your Hive player please watch this video tutorial
Play
Playlist
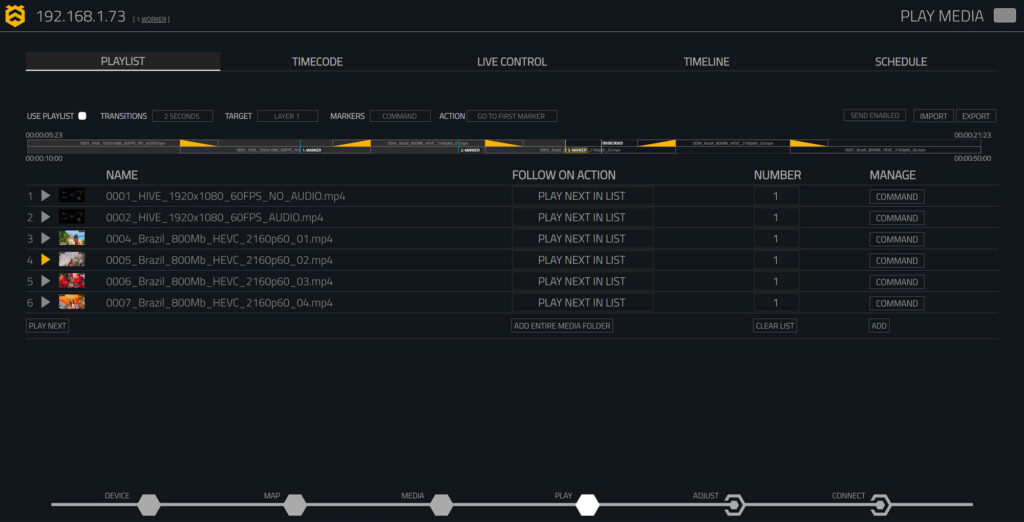
Programming a playlist is the simplest method of controlling media in the HIVE user interface.
This page allows users to specify which videos on their device should play and in what order. Users can also choose what happens after each video finishes, such as playing the next video in the list or selecting a video at random.
The playlist can be controlled on two layers, allowing for an overlay with a logo or ident on one layer while the playlist selects videos from the list on the other layer.
Live inputs can also be included in the playlist. The user can also specify transition duration and add markers. In queen / worker mode playlists are automatically synchronised and distributed from the queen to the workers.
External Clock
On the external clock page, users can synchronise video files stored on the device to an external clock such as SMPTE timecode. You can set trigger times for each video, which will automatically play in sync with the timecode signal when the external clock reaches the trigger time. Crossfades are also supported between timecode triggered content.
You can choose to lock the video file frame by frame to the source or free-wheel, maintaining synchronisation while allowing the video file to continue playing if the external clock stops transmitting.
Additionally, users can synchronise to the system clock, enabling scheduled playback of video files at defined times of the day. ArtNet timecode from devices like TIMECORE is also supported.
Live Control
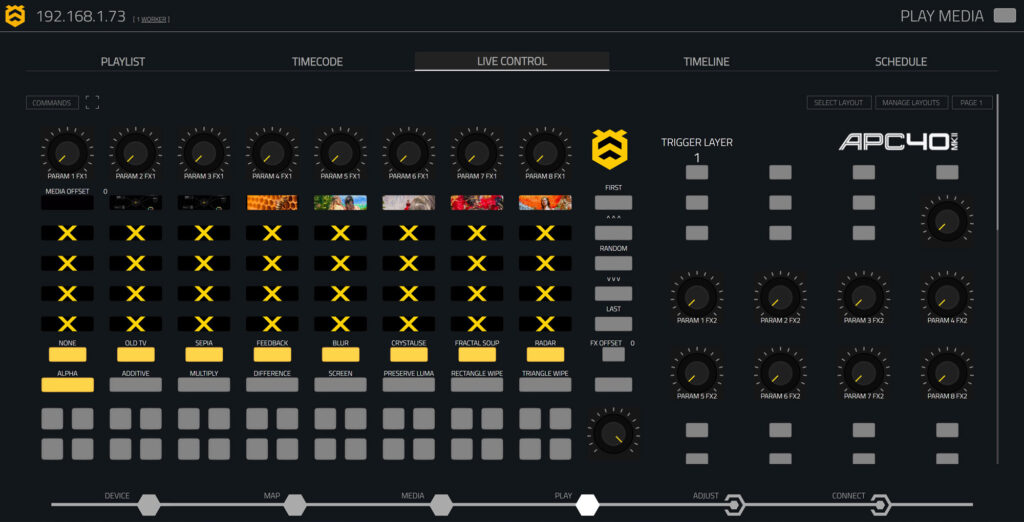
The live control page is a very flexible and powerful way to control your media, with 16 pages for adding buttons, faders, knobs, and custom controls to adjust any system parameter.
Users can add buttons to trigger media and composition triggers that activate all system parameters simultaneously, enabling the creation of complex scenes and effects with a single, user-customized control surface.
The control page can be configured to trigger from a MIDI device, or loaded directly through a web browser on various devices, such as smartphones, tablets, and laptops. Allowing the user to specify which areas of the system they want the operator to be able to control.
Timeline
The timeline page uses an intuitive nonlinear timeline to adjust media with key-framed opacity and 32 easing types, including linear, exponential, quadratic, bounce, and elastic.
Live inputs like USB HDMI/SDI and Newtek NDI can also be incorporated and mixed into the timeline.
Timelines can be added to the media list and triggered from playlists or external clock sources like USB timecode or ArtNet Timecode.
Users can import and export timelines to create multiple timelines for different chapters of their presentation.
Schedule
The Schedule page provides a list of time and date slots which the user can populate with events such as media playback, playlist triggering, timecode cue list loading, timeline playing and custom commands.
The schedule page can be used for many different applications such as loading a different show on weekdays to weekends, or switching the projectors off every day at a specified time.
Adjust
Settings
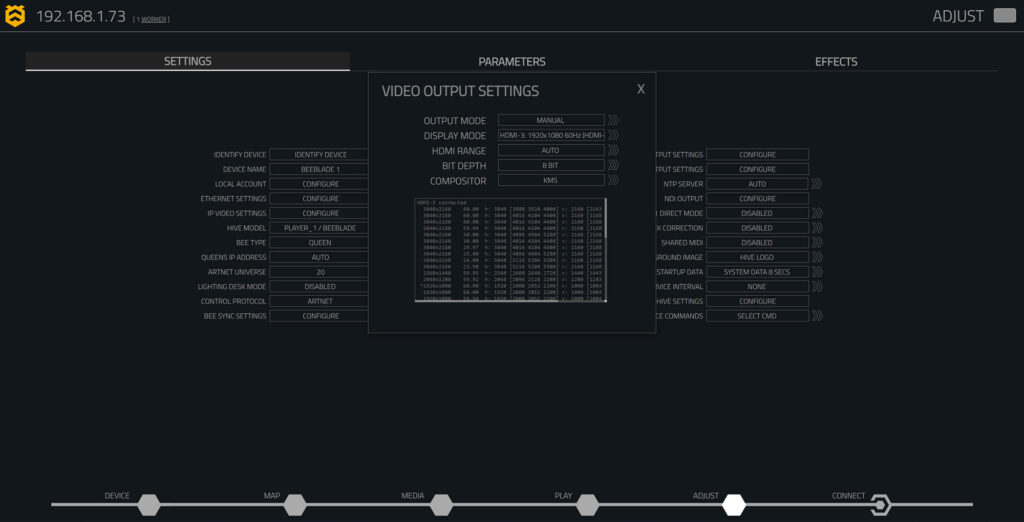
| DEVICE NAME | An editable name for this Hive player. |
| LOCAL ACCOUNT | The user can enter a username and password to restrict access to this Hive player. |
| ETHERNET SETTINGS | The user can configure static or DHCP, ip address, net mask, gateway & DNS. |
| BEE TYPE | Queen or Worker. |
| ARTNET UNIVERSE | What universe should be used to control this Hive player. |
| LIGHTING DESK MODE | If the user is controlling from a lighting desk they should enable this mode. |
| BEE SYNC SETTINGS | Hives proprietary HDMI Genlock technology. |
| OUTPUT SETTINGS | Configure the display mode and display parameters. |
| AUDIO SETTINGS | Select the Audio output device, inc external multi channel sound card support via USB. |
| NDI OUTPUT | Configure the NDI output from this hive player. |
| STARTUP DATA | Should the device display device info during the startup process? |
| SERVICE INTERVAL | Schedule restarts of your Hive player and specified times and days to perform essential maintenance. |
| DEVICE COMMANDS | From here you can send commands like restart, update from file, Set Clock time and many more. |
Parameters
Hive players have a vast number of controllable parameters, everything from size, position, scale, speed, rotation, colour adjustment; all the parameters you would expect from a full professional media server.
These parameters can be controlled manually with keyboard and mouse on the Parameters page. They can be saved to the device so that the device starts up with all the parameters as you have set them.
Where it gets really interesting is when you start controlling Hive player[s] with an external control surface like a lighting desk or any device which can control ArtNET fixtures. When you control your Hive players via ArtNET the parameters page serves as a monitoring page to show the user what each of the parameters is currently set to. Very handy when you quickly want to check the output from the lighting desk is setting the value you want!
There is a layer selection drop down too, which allows you to set or monitor the parameters on the 2nd layer.
These parameters and many others can be controlled via OSC, UDP, HTTP and other protocols, for further information please join our discord group, linked to in the support page and head to the resources section.
Effects
From the effects page you can apply effects to the video files playing on each layer. There is a maximum of 2 effects on each layer. The current effects list is as follows:
| OLD TV | Simulates the appearance of an old television screen. |
| SEPIA | Applies a warm brown tone to the media. |
| FEEDBACK | Creates a visual feedback effect, often with echoes. |
| BLUR | Softens the image, creating a blurred effect. |
| CRYSTALISE | Creates a crystal-like distortion in the media. |
| FRACTAL SOUP | Generates a fractal pattern overlay on the media. |
| RADAR | Produces a radar-like visual effect. |
| PIXELISE | Converts the image into a pixelated format. |
| SOFT EDGE OVAL | Creates a soft-edged oval effect on the media. |
| TILE | Applies a tiled pattern effect across the media. |
| INFINITY ZOOM | Creates a zoom effect that appears to be infinite. |
| DOT GRID | Overlays a grid of dots on the media. |
| KALEIDOSCOPE | Produces a kaleidoscopic visual effect. |
| MULTI MIRROR | Creates a multi-mirrored effect, reflecting the image. |
| REBELLE DISTORT | Distorts the image with a rebellious artistic effect. |
| 4 POINT WARP | Warps the image using four anchor points for distortion. |
We will be adding more effects soon. Feel free to get in touch and request an effect if there is something you would like to see in the system.
Connect
Cloud
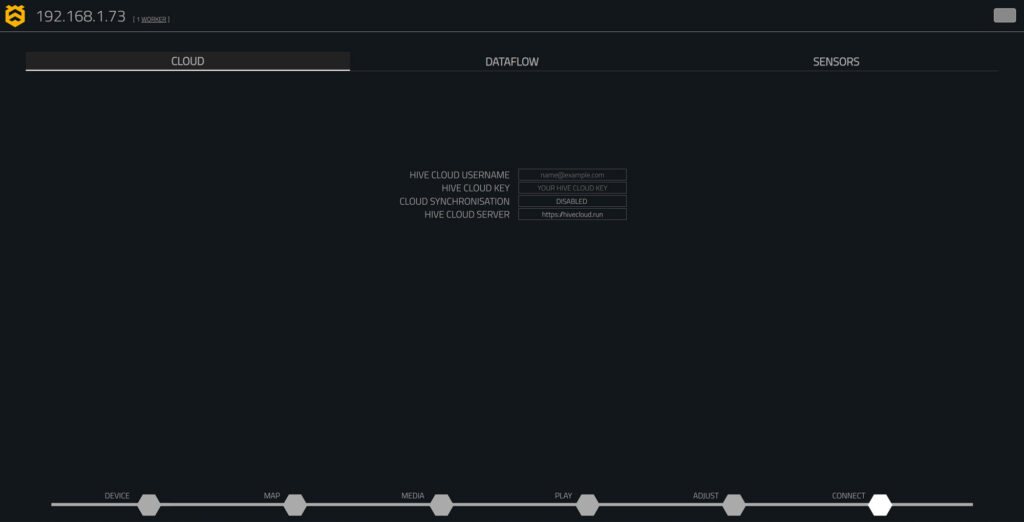
The cloud page connects Hive devices to Hive cloud services, enabling remote management and media playback control over the internet.
Once the user has entered their credentials into the cloud page the Hive player will appear within the Hive cloud software. This will allow full control of the Hive player software from anywhere with an internet connection.
Dataflow
A dataflow is a user-programmable, event-driven system that allows you to create dynamic, automated workflows within the Hive Player environment. By visually constructing a flowchart of interconnected nodes, you can respond to system events, modify parameters, and send control signals both internally within the Hive Player and externally to other devices.
This powerful system enables automation, interactivity, and deep customisation, making it possible to build responsive behaviours tailored to your specific needs. Whether triggering actions based on media events, processing sensor inputs, or sending network commands, Data-Flow provides a flexible and intuitive way to control and extend the functionality of Hive Player.
Sensors
Hive players support the wide array of network sensors available from www.phidgets.com.
Sensor types include switches, rotary encoders, linear encoders, temperature sensors, sound sensors light sensors and many, many more. All accessible through a low cost Phidget ethernet hub.
Contact our support team to discuss your application
More INFO onOUr Software
- Rock-solid embedded Linux render engine.
- Control from your phone, tablet or laptop via the web browser interface.
- Designed from the ground up by experienced AV professionals to be simple to use & easy to operate.
- Market leading lossless video codecs – H.264 & H.265 in addition to Notch LC & Avolites AiM.
- HDMI Genlock tool ‘Beesync’ utilises lightweight machine learning to predict and correct HDMI timing drift in real time, ensuring synchronised video output across any number of outputs.
- Build your own live control pages, accessible through your web browser or controlled by UDP, OSC, HTTP, Websockets, Stream deck, Companion & MIDI.
- Control the system from your lighting desk using ArtNet.
- Newtek NDI input & output.


